• Other Fluke companies:
  • Fluke
  • Fluke Biomedical
  • Fluke Networks
  • Fluke Process Instruments
See more Fluke brands
Accelix Amprobe Beha-Amprobe Comark Emaint Landauer Pacific Laser Systems Pomona RaySafe Schad
Home
Precision, Performance, Confidence.
Fluke Calibration: US
  • Register
  • Log in
  • Contact Us

US - English [Change]


Get Quote

I Just Got My Probe Recalibrated, Now What?

I just got my probe recalibrated, so now I just hook it up to the readout, load the coefficients and start measuring. I don’t have to worry about the probe’s calibration until it’s recalibrated.

Surprisingly, this is exactly how many people handle their probes’ calibrations. Following this practice saves a little time, but the cost can be severe. Recently, a company lost over a million dollars of product and six months of calibration work. The culprit was simply a PRT probe that shifted, probably during shipping, and wasn’t checked before being returned to service.

I hope this article will give you some ideas on how to make your temperature measurement program bulletproof by closing the loop on your probe calibrations.

What does “closing the loop” mean?

“Closing the loop” is completing the series of steps a probe should pass through as it is calibrated and used. In other words, there is more involved in managing a probe’s calibration than just sending the probe out for calibration every year.

The first step is a measurement taken to capture the status of the probe before it is boxed up and sent into shipping. This measurement closes the loop on the work the probe has done. When the probe is received back from calibration, another measurement is taken to verify that the probe didn’t shift during return shipment. Both the send-off measurement and return measurement are compared with the calibration report. This enables you to monitor the status of the probe, and it also provides a crosscheck between the calibration lab and your lab.

Measuring a probe before and after shipment may be the most important measurements in the overall calibration loop. Many probes and instruments are damaged beyond repair while in shipping. Make sure your work is closed out before shipping a probe.

How do I know if the probe is in tolerance?

Just because the probe was calibrated and given a calibration certificate doesn’t mean it was in tolerance. This might sound obvious, but I have had this conversation with enough customers to know that it is a common misconception. Someone who is surprised by this always follows up with the question “How do I know if the probe is in tolerance?”

Basically, the tolerance status of a probe is calculated by comparing the new calibration with the previous calibration. We answered this question in more detail in a previous Random News. Please refer to Random News Number 8.

How can “out of tolerance” be avoided?

The goal of all measurement programs is to make sure that everything always works and nothing is out of tolerance. Of course, the better the measurement program, the less often instruments are out of tolerance. Measuring a probe as it is sent out for calibration and when it is received from calibration is good, but the probe also needs to be monitored as it is being used.

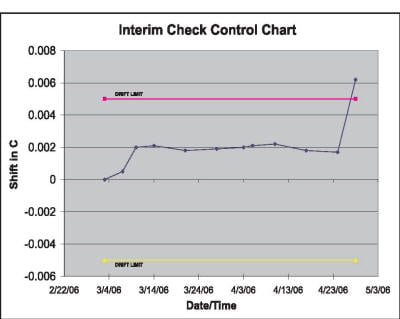
One of the difficulties in measuring temperature is that probes are typically very fragile so their performance is very dependent on care and handling. Manufacturers may spec a probe’s long-term drift, but the only sure way to know the performance of a probe is by implementing interim checks and control charts (see the sample control chart in Figure 1). Whenever interim checks are mentioned, someone always says “Who has the time?” My answer is “Who has the time to recall six months or a year’s worth of work?” In the situation mentioned earlier, a 30-minute check every week would have saved the company over a million dollars and six months of work.

How often should the probe be checked?

There are no established rules that define how often an interim check should be done. One approach to establishing an interval is to decide the largest recall interval you are comfortable with and set the interim check interval accordingly. For example, if you calibrate 10 instruments a week with your temperature probe, then a weekly interim check may be sufficient. The largest risk would be the recall of 10 instruments. A daily interim check would limit the risk to recalibration of two instruments.

At each interim check, record the data on a spreadsheet or in a lab book. Graph the data. This is the beginning of a control chart. Add control lines to the chart to indicate how much the probe can drift before it exceeds the limits set in the calibration program (see Figure at right). The sample control chart shows the data of a probe measured about every seven days. On 4/28/06 the probe’s shift was verified to be about 0.006 °C, which exceeds the process limit. Only four days of cal work may have to be recalled due to the shift.

What temperature points should be measured?

This is an essential question to ask because, depending on the situation, many different temperatures can be used. Mainly, the temperature point(s) should be fairly simple to achieve and, importantly, the temperature point(s) must be repeatable. Let’s go over a few options.

The triple-point of water (TPW), 0.010 °C, is most often used for closing the loop in probe calibrations. At Fluke Calibration, the TPW is measured multiple times in every platinum resistance thermometer (PRT) calibration to monitor the probe as it is calibrated.

The TPW is very important in PRT calibrations because it can be used to troubleshoot several types of problems that affect PRT performance. Not only is the TPW included in every ITS-90 calibration, it is used in every ITS-90 measurement as well. The ITS-90 was designed to allow the user to update the probe’s RTPW (resistance at the triple-point of water). Updating the RTPW coefficient can also help reduce errors due to probe drift. For these reasons, the TPW is the first choice for a quick check to verify and close the loop on a PRT.


  • Home
  • Products
    • New Products
    • Electrical Calibration
      • Electrical Standards
      • Electrical Calibrators
      • Bench Multimeters
      • Electrical Calibration Software
    • RF Calibration
      • RF Reference Sources
      • RF Calibration Accessories
      • RF Calibration Software
    • Data Acquisition and Test Equipment
      • Bench Multimeters
      • Data Acquisition
      • Data Acquisition Software
    • Temperature Calibration
      • ITS-90 Temperature Standards
        • ITS-90 Fixed-point cells
        • Standard Platinum Resistance Thermometers
        • Maintenance Apparatus
        • Liquid Nitrogen Comparison Calibrator
        • Resistance Bridges
        • Standard Resistors
      • Calibration Baths
        • Compact Calibration Baths
        • Standard Calibration Baths
        • Special Application Baths
        • Bath Accessories
        • Bath Controllers
        • Bath Fluids
      • Industrial Calibrators
        • Field Metrology Wells
        • Metrology Wells
        • Handheld Calibrators
        • Field Dry-Block Calibrators
        • Micro Baths
        • Infrared Calibrators
        • Thermocouple Furnaces
        • Dual Block Dry-Well
        • Zero-point Dry-Well
      • Probes / Sensors
        • Platinum Resistance Thermometers (PRTs)
        • Thermistors
        • Thermocouples
      • Digital Thermometer Readouts
      • Multifunction Calibrators
      • Temperature Calibration Software
    • Humidity Calibration
      • Humidity Generators
      • Humidity Data Loggers and Monitors
    • Pressure Calibration
      • Piston Gauges
        • NMI Piston Gauges
        • Absolute Piston Gauges
        • High Pressure Pneumatic Piston Gauges
        • Hydraulic Piston Gauges
        • Piston Gauge Accessories
      • Automated Pressure Controller / Calibrators
        • Low Pressure Controllers / Calibrators
        • Pneumatic Pressure Controllers / Calibrators
        • High Pressure Pneumatic Controller / Calibrators
        • Hydraulic Controller / Calibrators
      • Pressure Monitors
        • Low Pressure Monitors
        • Digital Pressure Gauges
        • Reference Pressure Monitors
      • Deadweight Testers
        • Pneumatic Deadweight Testers
        • Oil Deadweight Testers
        • Water Deadweight Testers
        • High-Pressure Hydraulic Deadweight Testers
        • Deadweight Tester Accessories
      • Manual Pressure Calibration
        • Pressure Calibrators
        • Pneumatic Pressure Control
        • Hydraulic Pressure Comparators / Pumps
      • Handheld Pressure Calibrators
      • Air Data Calibration
      • Environmental Monitors
      • Pressure Calibration Accessories
      • Pressure Calibration Custom Systems
      • Pressure Calibration Software
    • Flow Calibration
      • Gas Flow Standards
      • Gas Flow Accessories
      • GFS Primary Gravimetric Flow Standard
      • Flow Calibration Software
    • Process Calibration Tools
      • Temperature Calibrators
        • Handheld Temperature Calibrators
        • Dry-Block Calibrators and Micro-Baths
        • Precision Digital Thermometers
        • Temperature Probes
        • Infrared Calibrators
        • Hygro Thermometer with Data Logging
      • Pressure Calibrators
        • Digital Pressure Calibrators
        • Handheld Pressure Calibrators
        • Deadweight Testers
        • Precision Digital Pressure Gauges
        • Calibration Hand Pumps
      • Multifunction Calibrators
      • mA Loop Calibrators
      • Process Calibration Software
    • Calibration Software
      • MET/CAL® Software
      • MET/CAL® Support
      • Asset Management Software
      • Temperature Calibration Software
      • Pressure Calibration Software
      • Flow Calibration Software
      • Mechanical / Dimensional Calibration Software
    • Service and Support
    • All Calibration Instruments
    • Handheld Test Tools
  • Purchase Info
    • Where to Buy
    • Request a Quote
    • Request a Demo
    • Request a Sales Consultation
    • Certified Pre-Owned Equipment
    • General Services Administration (GSA)
    • Financing Program
    • National Stock Numbers (NSNs)
    • Payment Options and Tax Info
  • News
    • Press Releases
    • Promotions
    • Industry Links
    • Metrology Salary Survey
  • Training and Events
    • Conferences and Exhibitions
    • Training Courses
    • User Group Meetings
    • "How To" Seminars
    • Web Seminars
      • Live Seminars
      • On-Demand Seminars
  • Literature and Education
    • Education Hub
    • About Calibration
    • Articles and Education
    • Product Literature
    • Product Manuals (User Guides)
    • Videos and Virtual Demos
    • Resource Centers
    • Blog
  • Service and Support
    • Service Request (RMA)
    • Service Plans
    • Technical Support
    • Knowledge Base
    • Accreditations
    • Authorized Service Centers
    • Calibration Certificates
    • Community Forum
    • My MET/SUPPORT
      • Activate
      • Procedures
      • Software
      • Technical Bulletins
      • Priority Support
      • Manuals
    • Product Manuals (User Guides)
    • Safety Data Sheets (SDS)
    • Safety, Service, and Product Notices
    • Software Downloads
    • Tools
      • PT100 Calculator
      • PT100 Table Generator
      • ITS-90 Reference Function Calculator
      • Thermocouple Table Voltage Calculator
      • Thermocouple Voltage to Temperature Calculator
  • About Us
    • Contact Us
    • Visit Us
    • Employment
    • Fluke Calibration
      • Hart Scientific Temperature Calibration
      • DH Instruments Pressure and Flow Calibration
      • Pressurements Pressure Calibration
      • Ruska Pressure Calibration
    • Fluke Companies
    • Integrity and Compliance
    • Frequently Asked Questions
    • Why buy Fluke Calibration ?
Home|Literature|Articles and Education|Temperature Calibration|Papers / Articles|I Just Got My Probe Recalibrated, Now What?

Products

  • Product index
  • New products
  • Where to buy
  • Request a quote

Services

  • Calibration and repair
  • About Fluke Calibration
  • Service centers
  • Software downloads

Resources

  • Catalogs
  • Manuals
  • Web seminars
  • Subscribe to e-news
  • Supplier Handbook

Company

  • Contact us
  • About Fluke Calibration
  • Why choose us
  • Other Fluke companies
©1995-2023 Fluke Corporation
             

Secondary menu

  • Disclaimer
  • Privacy Statement
  • Terms of Use
  • Terms of Sale