- Other Fluke companies:
- Fluke
- Fluke Biomedical
- Fluke Networks
- Fluke Process Instruments
How to calibrate a pressure transmitter at the bench
What is transmitter calibration?
As with all electronic equipment, transmitters can lose accuracy over time leading to incorrect readings that can throw off procedures down the line resulting in waste or poor quality. Calibrating equipment like pressure transmitters brings the measurement readings back in line with standards using a known value to align with.
In this article you’ll learn the benefits of conducting pressure transmitter calibration at the bench vs the field, get an overview of the equipment needed to perform pressure transmitter calibration, and get the basic step-by-step procedures for how to calibrate a pressure transmitter.
Why calibrate at the bench?
Field calibration is often done to provide assurance of performance, but often does not provide adjustment to nominal “true” value. Bench calibration allows technicians to work as accurately as possible, effectively, and without degradation of performance associated with portable field equipment. Bench calibration can ensure that all components are in good working order prior to installation. Bench calibration of a pressure transmitter provides a stable, ambient environment for calibration, an opportunity to use the most accurate equipment, and protection from factory conditions during the commissioning, testing, and calibration of pressure transmitters. It also allows technicians time and a clean environment to evaluate the transmitter when component failure is suspected.
Pressure transmitter calibration equipment
In order to run a pressure transmitter calibration procedure, you need a few pieces of equipment at your bench. You will need:
- The pressure transmitter that needs to be calibrated
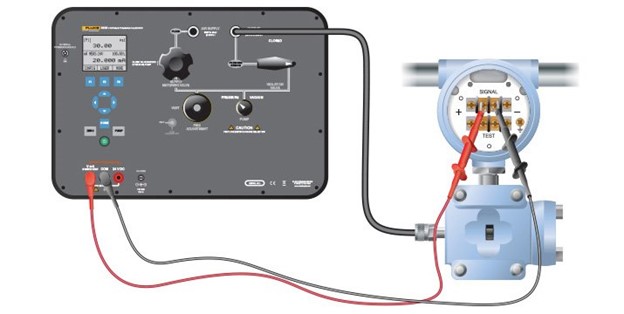
- A calibrator to simulate accurate pressure, like the Fluke Calibration P3000 Pneumatic Deadweight Tester, or the P3130 as shown in the diagram below
- A transmitter test hose
- 1 set of test leads
The diagram below details the connection points of each piece of equipment.
Pressure transmitter calibration diagram
 This diagram shows how to perform a calibration procedure on a pressure transmitter using a P3130
Pressure transmitter calibration procedure at the bench
Here are the basic steps for how to calibrate a pressure transmitter using the P3130:
- Connect the transmitter test hose from the calibrator to the transmitter.
- Connect the mA measurement jacks of the calibrator to the transmitter.
- Set the pressure/vacuum selection knob to the necessary function.
- Close the vent knob and supply metering valve.
- Apply pressure or vacuum from the pump by holding down the pump button and release when the necessary pressure is reached.
- Correct the pressure with the fine pressure adjustment.
- Read the reference pressure and the current output of the transmitter from the display.
- Repeat for all test points. If the measured mA signal at the test points is found within tolerance the test is complete. If not, adjustment is required.
Recommended Products
Keep Learning
- Automating the calibration of analog output pressure transmitters using the 2271A Industrial Pressure Calibrator
- Simplifying the maintenance of HART pressure transmitters with the 2271A Industrial Pressure Calibrator
- How to calibrate a HART communicator with a Fluke 754
- How to Calibrate a Pressure Gauge with the Fluke 8270A High-Pressure Controller Calibrator
- Simplifying the maintenance of HART pressure transmitters with the 2271A Industrial Pressure Calibrator
- Pressure Series, Part 1 of 3 - Introduction to Pressure Calibration
- Home
- Products
- New Products
- Electrical Calibration
- RF Calibration
- Data Acquisition and Test Equipment
- Temperature Calibration
- Humidity Calibration
- Pressure Calibration
- Flow Calibration
- Process Calibration Tools
- Calibration Software
- Service and Support
- All Calibration Instruments
- Handheld Test Tools
- Purchase Info
- News
- Training and Events
- Literature and Education
- Service and Support
- About Us


