- Other Fluke companies:
- Fluke
- Fluke Biomedical
- Fluke Networks
- Fluke Process Instruments
How traceability is restored to infrared calibration
There is a silent measurement quality crisis and few people are aware. Infrared thermometers are being used more and more for critical temperature measurements without much assurance that their values are accurate. Infrared thermometers can be calibrated to improve and assure measurement accuracy, but even the flat-plate radiation sources used to assure those measurements at temperatures below 1000 °C often lack the traceability necessary to be a reliable as a calibration standard.
So what’s the problem? The problem is that the flat-plate calibrators also need to be calibrated, and the traditional way these calibrators have been calibrated is in most cases critically flawed. To calibrate the calibrator you need to know two things, the surface temperature of the flat-plate, and the surface emissivity of the flat-plate.
Traditionally neither of these are measured. In fact, traditionally the only thing measured is the internal temperature of the flat-plate. Temperature losses at the surface, inhomogeneity in the surface temperature, and a lack of traceable measurement of the emissivity at the time of calibration all contribute to errors that can far exceed the stated uncertainties of the calibration.
This leads to a situation where the laboratory staff may take the rather unscientific approach of changing the position of the thermometer in relation to the flat plate until they find the “sweet spot” where the thermometer passes calibration. This is not good metrology.
To solve this problem, Fluke Calibration developed a Radiation Thermometry Laboratory. Its mission is to improve and assure measurement accuracy and traceability in radiometric calibration of infrared thermometers. To make a reliable flat-plate calibrator that is easy to use, a lot of work has to be done behind the scenes in the calibration lab to ensure measurement quality.
For an in depth look at how this was done, see the paper by Frank Liebmann and Tom Kolat, published in NCSLI Measure Magazine titled Traceability and Quality Control in a Radiation Thermometry Laboratory. It describes the quality control measures that were taken at Fluke Calibration to improve and assure measurement accuracy for radiometric calibrations. Here are some of the highlights:
The Radiation Thermometry Laboratory
The laboratory includes a series of custom designed blackbodies to support the calibration of a radiometric transfer standard used to calibrate the surface temperature of flat-plate calibrators. Once the calibrators are themselves radiometrically calibrated by the transfer standard, traceability is restored for infrared thermometer calibrations.
Traceability Chain

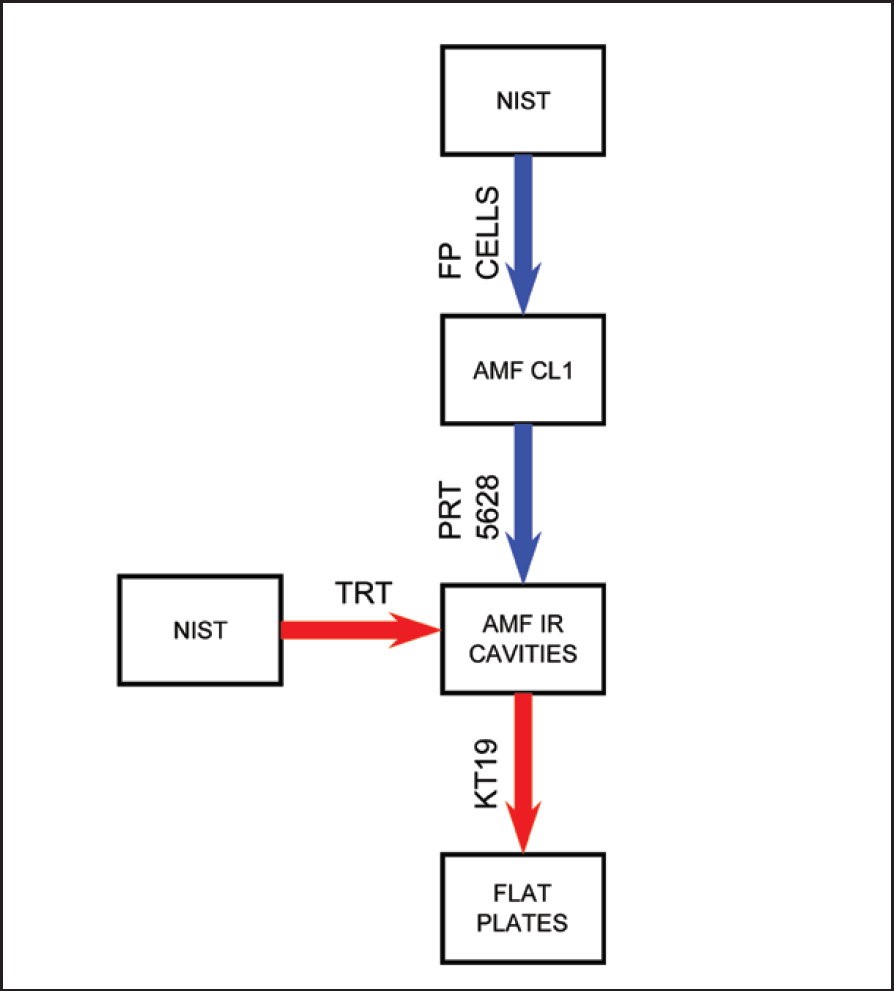
Figure 1. Radiometric traceability chain
According the paper, at Fluke Calibration flat-plate calibrators are measured by a KT19 radiometric transfer standard. The KT19 transfer standard is calibrated regularly by custom designed blackbody cavities through a water cooled aperture. The cavity temperature is maintained using Fluke Calibration temperature controlled calibration baths. The bath temperatures are determined by platinum resistance thermometers traceable to NIST through ITS-90 fixed point cells. As a final quality check to verify the radiometric calibration results, a Heitronics TRTII that is traceable to NIST is compared to the KT19 against the laboratory’s blackbody cavities demonstrating normal equivalence. See paper for normal equivalence results between Fluke Calibration and NIST.
Cavity Uniformity
Figure 2. Blackbody cavity with water-cooled aperture and purge tube
Frank and Tom indicate that it’s not enough to have blackbody cavities in baths with carefully controlled temperatures, there also needs to be temperature uniformity along the main axis of the cavity, so they mapped the temperature of the cavity using the Heitronics TRTII. To improve these results and to decrease the temperature drop between the bath fluid and the cavity walls a hot gas purge was applied with a carefully chosen flow rate to the apex of the blackbody cone.
The air goes through tubing and forms a helix inside the bath fluid. In this way, it reaches the bath temperature before it exits into the blackbody.
Using the purge Fluke Calibration assured that even the air inside the cavity was at the right temperature.
Quality Control Measures
Fluke Calibration to the following steps to assure trueness of the transfer standard calibration.
- Self-consistency check
- Alignment procedure coupled with calculation of size of source effect uncertainty
- Long term stability analysis
- Cross-checks for verification of blackbody radiometric temperature
- Controlling transfer standard operating temperature
- Control of transfer standard warm up time
- Use of a hot gas purge
The paper also outlines the following steps taken to reduce uncertainties in the flat-plate calibration.
- Control of reflected radiation near room temperature
- Use of a water-cooled aperture to control optical scatter
- Efforts to control dew and ice below the dew point
A quality radiation thermometry program depends on quality radiometric metrology. To calibrate infrared thermometers below 1000 °C you need a reliable flat-plate calibrator. Frank and Tom do a very nice job explaining everything that goes on behind the scenes to make a flat-plate calibrator you can rely on. Hopefully, the infrared thermometers you rely on are calibrated by one of these.
For more information on this topic read:
- Inicie sesión o regístrese para enviar comentarios
- Printer-friendly version »
- Home
- Products
- New Products
- Electrical Calibration
- RF Calibration
- Data Acquisition and Test Equipment
- Temperature Calibration
- Humidity Calibration
- Pressure Calibration
- Flow Calibration
- Process Calibration Tools
- Calibration Software
- Service and Support
- All Calibration Instruments
- Handheld Test Tools
- Purchase Info
- News
- Training and Events
- Literature and Education
- Service and Support
- About Us


