- Other Fluke companies:
- Fluke
- Fluke Biomedical
- Fluke Networks
- Fluke Process Instruments
Metrology Wells Versus Dry-Wells: Do Vertical Gradients Really Matter?
By Mingjian Zhao, Director of Primary Standard Engineering
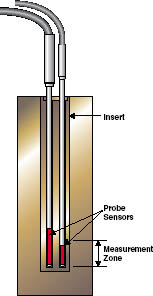 Dry-well calibrators are widely used as temperature standards in many calibration laboratories and in various industrial fields. It’s well known that the axial temperature uniformity of a dry-well calibrator is generally worse (usually much worse) than that of a liquid bath. How much do these vertical temperature gradients really affect your calibration? Why would you consider Metrology Wells as an alternative to both dry-wells and fluid baths?
Axial temperature uniformity and its contribution to calibration errors
The top and bottom of a dry-well lose heat at different rates than at the center. This occurs because the bottom end is better insulated from ambient effects than is the top end. The result is a temperature gradient axially along the well. The design of the dry-well compensates for this gradient by attempting to distribute heat to varying optimal degrees along the length of the block. This is very difficult to do, however, because axial temperature uniformities vary at different temperatures, creating ever-changing profiles of needed heat distribution.
A thermometer’s reading in a dry-well is the average value of the sensed temperatures along the sensor in the block of the dry-well. PRT sensors have varying lengths and may be located at slightly different positions within their sheaths. Comparing different types of sensors (for example short, sensitive thermocouples or thermistors to long PRT sensors, can create a significant axial location difference making these comparisons particularly susceptible to axial gradients. Therefore, axial temperature non-uniformity of a dry-well calibrator can be a significant contributor to calibration error.
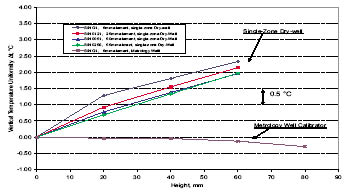 |
| Figure 2 Axial temperature uniformity at 660 °C using different PRTs |
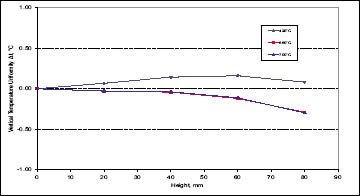 |
| Figure 3 Axial temperature uniformity of a Metrology Well at different temperatures |
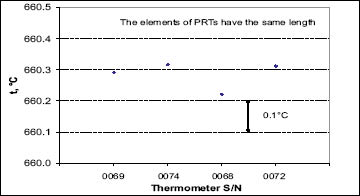 |
| Figure 4 Comparison calibration of PRTs with identical element lengths at 660 °C in a dry-well |
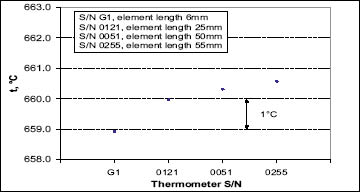 |
| Figure 5 Comparison calibration results of PRTs with different element lengths at 660 °C |
What makes the difference in Metrology Wells?
In order to reduce calibration errors and improve the performance of field-usable calibrators, a new type of calibrator with dual-zone control, named “Metrology Wells,” was developed at Fluke Calibration. Many new technologies are applied in the Metrology Wells, and overall performance is improved dramatically over dry-wells. The biggest improvement comes from the excellent axial temperature uniformities across each Metrology Well’s entire temperature range. This improvement comes from technology that automatically adjusts the temperature at the top zone to minimize the differential temperature between the two zones at any temperature setting.
Axial uniformity of Metrology Wells vs. dry-well calibrators
Tests show that measurement results vary significantly when using two different PRTs with different sensor dimensions in the same dry-well at the same temperature. Figure 2 illustrates the relatively poor axial uniformity of a typical dry-well; it also shows that the shorter the sensing element of the thermometer used to measure the uniformity, the worse the uniformity appears, since each element averages the temperatures sensed across its length. Figures 2 and 3 also indicate the significant difference in performance of a Metrology Well.
Calibration using the single-zone dry-well calibrator
To see the typical magnitude of errors derived from a dry-well, including axial gradients, radial gradients, and stem conduction, several PRTs were calibrated using a dry-well and a reference thermometer. Four PRTs with identical element lengths were tested after they were first calibrated in fixed-point cells to ensure consistent results. Then the PRTs were measured in the dry-well calibrator at a temperature near 660 °C. The measured temperatures of the PRTs are shown in Figure 4. The maximum difference was slightly less than 0.1 °C. Since the PRTs were of similar construction, differences due to axial temperature non-uniformity and stem conduction would be negligible, leaving us to conclude that most of the error is due to radial temperature non-uniformity.
When using PRTs of varying element lengths, the errors were much larger. The results of comparing PRTs with different element lengths at 660 °C are shown in Figure 5. These also were previously calibrated in fixed-point cells for consistency. The differences between measurements were as large as nearly 2 °C. The tight fit of the probes in the wells and their adequate immersion depth precluded stem conduction from causing such large errors. We have to conclude that the large errors are primarily due to the effects of axial temperature gradients.
Calibration using the Metrology Well calibrator
Similar tests were performed with a Metrology Well. Eight precision PRTs with different element lengths were used in the experiment. All PRTs were calibrated by fixed-point cells from water to aluminum. The sensor element lengths of the probes are all less than 55 mm, but vary. Results of comparing each of seven of the PRTs against the eighth at three temperatures are shown in Table 1.
| Table 1. PRT Comparisons in a Metrology Well Calibrator (differences in °C) | |||||||
| Temperature Set Points | UUT #1 | UUT #2 | UUT #3 | UUT #4 | UUT #5 | UUT #6 | UUT #7 |
| Element length | 50 mm | 6 mm | 50 mm | 25 mm | 50 mm | 55 mm | 45 mm |
| 660°C | +0.03 | -0.01 | +0.02 | -0.01 | +0.03 | -0.08 | -0.01 |
| 420°C | +0.02 | -0.01 | +0.01 | -0.00 | +0.02 | +0.02 | -0.02 |
| 232°C | +0.01 | -0.01 | +0.01 | -0.01 | +0.01 | +0.02 | +0.01 |
Conclusion
These simple tests illustrate that the axial uniformity of Metrology Wells can be 10–20 times better than the axial uniformity of a typical dry-well. This matters because in
many cases axial uniformity is the largest single contributor to uncertainty when using a
dry-well, and because axial uniformity can affect other components of uncertainty,
such as radial uniformities, thermal loading effects, stem conduction heat loss, and
control stability.
Does this mean that dry-wells are poor instruments? Of course not. Dry-wells are perfectly suited for many field applications with less rigorous performance requirements. They are fast, light, portable, inexpensive, and perform perfectly well for many applications. Does it mean that Metrology Wells can replace fluid baths? In some cases, yes; the performance of Metrology Wells is so good that their speed and absence of a fluid can be taken advantage of, in both field and lab applications. However, the very best temperature stability and uniformity over most commonly used temperatures are still found in a bath. And baths have that wonderful characteristic of being able to handle thermometers of many varied types, sizes, and sensor dimensions.
Keep learning
Dry-Block Calibrators vs. Temperature Baths: Choosing the Right One for You - app note
Introduction to Dry Block Calibrators - video
Selecting a dry-block calibrator - app note & video
Recommended products
Calibration reference probes & sensors
Get help
Need help choosing a product? Speak with a calibration equipment expert
- Home
- Products
- New Products
- Electrical Calibration
- RF Calibration
- Data Acquisition and Test Equipment
- Temperature Calibration
- Humidity Calibration
- Pressure Calibration
- Flow Calibration
- Process Calibration Tools
- Calibration Software
- Service and Support
- All Calibration Instruments
- Handheld Test Tools
- Purchase Info
- News
- Training and Events
- Literature and Education
- Service and Support
- About Us

