- Other Fluke companies:
- Fluke
- Fluke Biomedical
- Fluke Networks
- Fluke Process Instruments
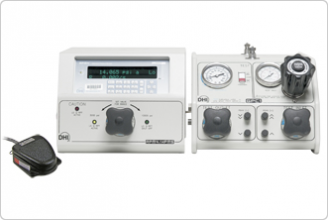
PGC-10000-AF Pneumatic Gauge Calibrator
This product is discontinued. Recommended replacement is:
8270A and 8370A Modular High-Pressure Controllers / Calibrators
This pneumatic pressure gauge calibrator optimizes the testing and calibration of analog and digital pressure gauges and indicators in ranges from < 500 to 10,000 psi (3.5 to 70 MPa) using gas as the operating medium.
- Calibrate any range device in gas from less than 500 to 10,000 psi (70 MPa) FS with one compact, integrated system
- Effortless operation; no pumping, no weight lifting
- Includes gas booster to boost a bottled air supply as low as 400 psi (2.75 MPa) to 10,000 psi (70 MPa)
- Easily set pressure to DUT cardinal point and read back actual pressure from the reference
- On-board calibration routines with real time out-of-tolerance notification and data logging
- Foot pedal “ENTER key for hands free sequence execution
- Complete a typical high pressure gauge run in about 20 minutes (20 % ascending increments)
- Supports 12 units of measure and custom units
- Push button switching between gauge and absolute measurement modes
- RS232 and IEEE-488 interfaces included; compatible with COMPASS® for Pressure software
- Delivered with connectors and adaptors for NPT, AN4 and gland and collar DUTs
- Includes molded, reusable transit case for shipping RPM4/HPMS transfer standard for recalibration
PGC-10000-AF Pneumatic Gauge Calibrator is a special pressure gauge calibrator made up of Fluke Calibration's GPC1 Gas Pressure Controller and RPM4 A70M/A20M Reference Pressure Monitor (see the GPC1 and RPM4 brochures for details). The PGC-10000-AF is a pressure gauge calibrator that is designed to optimize the testing and calibration of analog and digital pressure gauges with ranges from less than 500 psi (3.5 MPa) to 10,000 psi (70 MPa). This special pressure gauge calibration configuration was selected by the United States Air Force as the next generation high pressure pneumatic gauge calibration system for deployment in its Precision Measurement Equipment Laboratories (PMELs) throughout the world.
With GPC1 and associated GB-152 Gas Booster, the pressure gauge calibration operator effortlessly generates and adjusts pressure to set the device under test to its cardinal point. The RPM4 then precisely measures the actual pressure applied.
Interactive RPM4 embedded software automatically sets up the pressure gauge calibration procedure based on entry of the DUT full scale and tolerance. It then steps the operator through the test, logging data and providing real time notification of in or out-of-tolerance conditions at each point. A foot pedal “ENTER switch allows the operator to trigger readings hands free.
General |
|
| Power Requirements | 85 to 264 VAC, 50/60 Hz, 25 VA max consumption and 12 VDC, 1.2A |
| Pneumatic Power Supply | 75 psig (500 kPa) shop air at 15 to 75 scfm (425 to 2,125 slm) and 100 psig (700 kPa) clean, dry gas |
| Test Gas Supply | 400 to 3 000 psi (3 to 20 MPa) Maximum high pressure output is high pressure supply times 25 |
| Operating Temperature Range | 18 to 28 °C (64 to 82 °F) |
| Weight | |
| RPM4/HPMS: | 11.0 kg (22 lb) |
| GPC1: | 24.0 kg (53 lb) |
| GB-152: | 16.4 kg (36 lb) |
| Total: | 51.4 kg (113 lb) |
| Benchtop System Footprint (GB-152 Gas Booster mounted under bench) | 75 cm W x 60 cm D (30 in. x 24 in.) |
| Overall Pressure Range | |
| Gauge mode: | 0 to 10,000 psig |
| Absolute mode: | atm to 10,000 psia (70 MPa) |
| Standard Test Fluid | Any non-corrosive gas |
| Test Connection | DH500 (gland and collar type for coned and left hand threaded tube equivalent to AE F250C, HIP HF4, etc.), adaptors to 1/8 in. NPT M, 1/4 in. NPT M, 1/4 in. NPT F, AN4 M provided |
Pressure ranges (all ranges are gauge and absolute) |
|
| Hi Q-RPT | 10,000 psi (70 MPa) |
| Lo Q-RPT | 3,000 psi (20 MPa) |
Pressure measurement |
|
| Precision1 | |
| Hi Q-RPT1: | ± 0.0175% of reading or 0.44 psi (3 kPa), whichever is larger |
| Lo Q-RPT: | ±0.0175% of reading or 0.13 psi (0.9 kPa), whichever is larger |
| Operating Temperature Range | 18 to 28 °C |
| Predicted Stability2 | ±0.004% of reading |
| Measurement Uncertainty3 | |
| Hi Q-RPT: | ±0.02% of reading or 0.5 psi (3.5 kPa), whichever is larger |
| Lo Q-RPT: | ±0.02% of reading or 0.15 psi (1 kPa), whichever is larger |
1 Precision: Combined linearity, hysteresis, repeatability.
2 Stability: Change in zero and span, with use of AutoZ feature, over 6 months period for typical RPT used under typical conditions. As stability can only be predicted and varies from Q-RPT to Q-RPT, stability for a specific Q-RPT should be established from experience.
3 Maximum deviation of the Q-RPT indication from the true value of applied pressure including precision, predicted one year stability, temperature effect and calibration uncertainty (assumes calibration reference uncertainty of ±0.005% of reading), combined and expanded (k=2) following the ISO “Guide to the Expression of Uncertainty in Measurement.
| Model Name | Description |
|---|---|
| PGC-10000-AF |
Pneumatic Gauge Calibrator Includes:
|
- Home
- Products
- New Products
- Electrical Calibration
- RF Calibration
- Data Acquisition and Test Equipment
- Temperature Calibration
- Humidity Calibration
- Pressure Calibration
- Flow Calibration
- Process Calibration Tools
- Calibration Software
- Service and Support
- All Calibration Instruments
- Handheld Test Tools
- Purchase Info
- News
- Training and Events
- Literature and Education
- Service and Support
- About Us
Sidebar Request a Quote
Request a quote


