- Other Fluke companies:
- Fluke
- Fluke Biomedical
- Fluke Networks
- Fluke Process Instruments
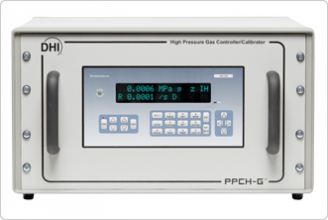
PPCH-G Automated Gas Pressure Controller / Calibrator
This product is discontinued. Please see the 8270A and 8370A Modular High-Pressure Controllers / Calibrators.
High performance pressure control to 100 MPa (15,000 psi)
- For gas pressures up to 15,000 psi (100 MPa)
- AutoRange feature
- One or two Q-RPTs in each controller with 10:1 turndown
- Supports external reference pressure transducers
- FLASH memory for simple and free embedded software upgrade
PPCH-G™, is a gas pressure controller/calibrator for gas pressure operation from 1 to 100 MPa (150 to 15,000 psi). As with the rest of the PPC family of pressure controllers, the emphasis is on high end performance, minimizing measurement uncertainty and maintaining precise control over a very wide pressure range… in a compact and rugged instrument.
Individually characterized, quartz reference pressure transducer (Q-RPT) modules increase precision and reduce measurement uncertainty. The AutoRange™ feature supports infinite ranging, automatically optimizing all aspects of operation for the exact desired range and taking pressure controller rangeability to a new level.
A unique pressure control system and gas booster accessory provide unlimited, on-demand pressure, very high control resolution and 10:1 pressure control turndown. Five different control modes are included for maximum versatility. Open architecture allows reference pressure measurement to be internal to or remote from the controller. If desired, the reference can be located at the test measurement point and independently removed for recalibration.
With all of this, PPCH-G opens new doors in automated high gas pressure calibration and test applications.
Quartz Reference Pressure Transducer (Q-RPT) Modules
PPCH-G's outstanding pressure measurement specifications are made possible by the exclusive quartz reference pressure transducer (Q-RPT) modules.
Q-RPTs measure pressure by measuring the change in the natural oscillating frequency of a quartz crystal with pressure induced stress. To be qualified for use in a Q-RPT module, each transducer is individually evaluated and characterized using automated primary pressure standards. Only transducers exhibiting required levels of linearity, repeatability and stability are selected. A proprietary compensation model, derived from more than 15 years experience with thousands of quartz pressure transducers, is applied to optimize the metrological characteristics needed in a transfer standard.
PPCH-G can be delivered with a low cost utility sensor for applications in which the high precision and stability of a Q-RPT are not required.
Q-RPTs available for PPCH-G |
||
|
Q-RPT Designation |
SI Version Maximum Range Absolute Gauge (MPa) |
US Version Maximum Range AbsoluteGauge (psi) |
|
A100M |
100 |
15 000 |
|
A70M |
70 |
10 000 |
|
A40M |
40 |
6 000 |
|
A20M |
20 |
3 000 |
|
A10M |
10 |
1 500 |
|
A7M |
7 |
1 000 |
Infinite Ranging™ and AutoRange™
There's a lot more to covering a wide range of test devices with a single gas pressure controller than "% of reading" measurement uncertainty.
In addition to the necessary measurement uncertainty, PPCH-G offers the full pressure control and feature adaptability that are needed for true rangeability in test and calibration applications. Infinite Ranging gives PPCH-G unprecedented versatility in adapting to a wide variety of devices to be tested. With the easy to use AutoRange function, a few simple key strokes or a single remote command string at the start of a test adapts every feature of the gas pressure controller to optimize it for a specific range.
Open architecture
A PPCH-G controller can be configured with up to four Q-RPTmodules. These can be internal or external to the PPCH-G controller. External Q-RPTs are in RPM4™ Reference Pressure Monitors. The RPM4's Q-RPTs then become part of the PPCH-G system and are managed by PPCH-G. External Q-RPTs must be disconnected or protected by valves when PPCH-G is used at pressure greater than the external Q-RPT range.
Examples of possible PPCH-G system configurations include:
- A PPCH-G with one or two built-in Q-RPTs to act as a stand alone, "one box" controller/calibrator package.
- A PPCH-G with no internal Q-RPTs and an external Q-RPT to configure a system whose reference pressure measurement is remote from the controller. This configuration is ideal when it is advantageous for the reference to be removed from the system (e.g. for recalibration) while leaving the controller installed or to locate the reference measurement in closer proximity to the device or system under test.
- A PPCH-G with a built-in Q-RPT to automate pressure controll to a PG7202 piston gauge.
- A PPCH-G with no built-in Q-RPTs to act as a lower cost automated pressure setting and controlling device.
PPCH-G General Specifications |
|
| Power Requirements | 85 to 264 VAC, 50/60 Hz, 75 W max |
| Temperature Range | 15 to 35 °C |
| Vibration | Meets MIL-T-28800D |
| Weight (Typical) | 32 kg approx (70 lb) |
| Dimensions | 30 cm H x 52 cm W x 50 cm D (12 in. x 20.5 in. x 20 in.) with enclosure, also 6U H rack mount |
| Communications Ports | RS232 (COM1, COM2), IEEE-488.2 |
| Operating Modes | Gauge, absolute |
| Pressure Ranges | Atmosphere to 100 MPa (15 000 psi) |
| Operating Media | Nitrogen, air (others optional) |
| Drive Air Supply | 500 to 800 kPa (75 to 120 psi) |
| Test Gas Supply | Greater than maximum pressure to be controlled by at least 5% of controller range, but not more than 15% greater than controller range, minimum 70% of controller range, ± 1 % stabillity. Flow adequate to maintain stable supply while slewing into test volume. |
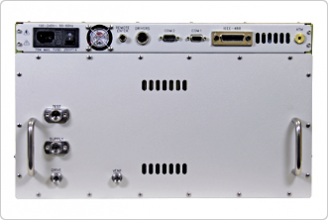
| Pressure Connections | Drive air supply: 1/8 in. NPT F Test gas supply: DH500 (equivalent to AE F250C, HIP HF4) Test: DH500 |
| Utility Sensor | Precision/Resolution ± 0.10 % span / 0.001 % span Drivers (8) 12V, 1 A max total output CE Conformance Available, must be specified |
Pressure control |
|
| Control Modes |
Dynamic (standard and high volume): Sets target within hold limit and continuously adjusts pressure to remain at target value. Static: Sets target within hold limit and stops control, allowing pressure to stabilize naturally. Monotonic: Sets pressure to target and maintains very slow ramp in same direction as pressure increment. Ramp: Sets and maintains user specified rate of change of pressure. Piston Gauge Control : Automates piston gauge pressure control. |
| Control Precision | To ± 0.001 % of Q-RPT span (standard dynamic) |
| Control Volume | 0 cm3 to 100 cm3, 50 cc optimum (operates in larger volumes but pressure stabilizing time increases) |
| Slew rate | 60 sec. 0 to full scale, 50 cc volume |
| Dynamic mode Typical Time to Ready | 200 seconds into 50 cm3 volume and 20% FS excursions with default hold limits (assuming no supply limitation). |
| Lowest Controllable Pressure | 0.7 MPa (100 psi) |
Measured and delivered pressure (Q-RPT) |
|
| Warm Up Time | 30 minute temperature stabilization recommended from cold power up |
| Resolution | To 1 ppm, user adjustable |
| Predicted One Year Stability2 | ± 0.005 % of reading |
| Calibration | A2LA accredited calibration report included |
| Q-RPTs A20M to A100M |
Precision1: Greater of ± 0.012% of reading or 0.0036% of Q-RPT span5 Measurement Uncertainty3: Greater of ±0.013 % of reading or 0.004% of Q-RPT span5Delivered Pressure Uncertainty (Dynamic Mode): Greater of ± 0.016% of reading or 0.005% of Q-RPT span5 |
Q-RPTs A7M to A14M |
|
| Precision1 |
Standard Class Premium Class |
| Measurement Uncertainty3 |
Standard Class Premium Class |
| Delivered Pressure Uncertainty (Dynamic Mode)4 |
Standard Class Premium Class |
Q-RPTs A20M to A100M |
|
| Precision1 | Greater of ± 0.012% of reading or 0.0036% of Q-RPT span5 |
| Measurement Uncertainty3 | Greater of ± 0.013 % of reading or 0.004% of Q-RPT span5 |
| Delivered Pressure Uncertainty (Dynamic Mode) |
Greater of ± 0.016% of reading or 0.005% of Q-RPT span5 |
- Combined linearity, hysteresis and repeatability.
- Predicted Q-RPT measurement stability limit (k=2) over one year assuming regular use of AutoZero function. AutoZero occurs automatically in gauge mode whenever vented, by comparison with barometric reference in absolute mode. Absolute mode predicted one year stability without AutoZ is ± (0.005 % Q-RPT span + 0.005 % of reading).
- Maximum deviation of the Q-RPT indication from the true value of applied pressure including precision, predicted one year stability, temperature effect and calibration ncertainty, combined and expanded (k=2) following the ISO "Guide to the Expression of Uncertainty in Measurement."
- Maximum deviation of the PPCH-G controlled pressure from the true value including measurement uncertainty and standard dynamic mode control hold limit.
- % of reading applies to 30 to 100 % of Q-RPT span. Under 30 % of Q-RPT span, uncertainty is a constant value obtained by multiplying the % of reading value by 30 % of Q-RPT span.
- % of reading value times measured pressure from 100 to 30 % of AutoRanged span. Under 30% of AutoRanged span, % of reading value times 30% of AutoRanged span. If AutoRanged span is less then 30% of maximum Q-RPT span, % of reading values times measured pressure, or % of reading times 9% of Q-RPT span, whichever is greater.
| Model Name | Description |
|---|---|
| PPCH-G-nnn/M |
PPCH-G™ Automated Gas Pressure Controller/Calibrator for High Pressure with no internal Q-RPT Where: |
| PPCH-G-nnn/M AnnnMc1/AnnnMc2 |
PPCH-G™ Automated Gas Pressure Controller/Calibrator for High Pressure with one or two internal Q-RPTs Where: AnnnMc1 indicates the Hi RPT designation. AnnnMc2 indicates the Lo A-RPT designation (A70M max). c indicates class (s for Standard, P for Premium). Leave blank if there is no Lo Q-RPT. |
Accessories common to all models:
| Accessory | Description |
|---|---|
| Footswitch |
Remote [ENTER] footswitch |
| PPCH-G 04-02 |
SI Units version |
| PPCH-G 05-01 |
CE mark |
| RS232 Cable |
9-pin, 2 m for PPC3 COM1 or PPC3-to-RPM4 connections |
| RPM4 |
Reference pressure monitor for external Q-RPTs |
| PPCH-G 06-01 |
Enclosure (for bench applications) |
| PPCH-G 07 |
PPCH-G 07 |
| PPCH-G 08-SP |
Special fluid |
| GB-H-152 Gas Booster Package |
Gas booster package designed to provide a regulated high pressure gas output to PPCH-G |
| Priority Gold Instrument CarePlan |
Fluke Calibration Priority Gold Instrument CarePlans are available for most calibration products. Please contact your local Fluke Calibration sales representative for details or to request a quote. You may also call the Customer Care Center at 800-882-6153 or send email to premiumcare@fluke.com. |
| Silver CarePlan |
Fluke Calibration Silver CarePlans are available for most calibration products. Please contact your local Fluke Calibration sales representative for details or to request a quote. You may also call the Customer Care Center at 877-355-3225 or send email to careplans@flukecal.com. |
| Data Sheets |
|---|
| Firmware |
|---|
| PPCH-G v1.02k Embedded Software |
| Instruction Sheets |
|---|
| Free Utilities |
|---|
| CalTool for RPTs Free Utility |
- Home
- Products
- New Products
- Electrical Calibration
- RF Calibration
- Data Acquisition and Test Equipment
- Temperature Calibration
- Humidity Calibration
- Pressure Calibration
- Flow Calibration
- Process Calibration Tools
- Calibration Software
- Service and Support
- All Calibration Instruments
- Handheld Test Tools
- Purchase Info
- News
- Training and Events
- Literature and Education
- Service and Support
- About Us
Sidebar Request a Quote
Request a quote


