- Other Fluke companies:
- Fluke
- Fluke Biomedical
- Fluke Networks
- Fluke Process Instruments
Automated primary pressure reference for absolute and gauge pressures to 500 kPa
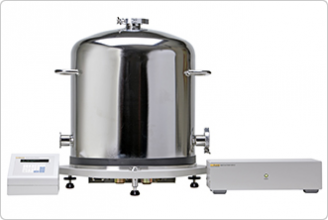
The PG9607 is the next generation of absolute pressure piston gauge from Fluke Calibration. It supports the use of a 100 kg mass set to define gauge and absolute pressures from 11 to 500 kPa with a single piston-cylinder.
The PG9602 is the next generation of absolute pressure piston gauge from Fluke Calibration. It includes multiple piston cylinder range options to support absolute or gauge pressure measurements from 12 kPa to 10 MPa.
This piston gauge is designed for use as a true primary pressure reference in metrology and research institutes. Its performance is centered around a 50 mm piston-cylinder assembly with dimensional characteristics suitable for low-uncertainty dimensional traceability. The piston mounting post allows controlled clearance operation and reduced uncertainty on piston-cylinder temperature measurement. The new platform architecture promotes improved temperature stability around the piston-cylinder.
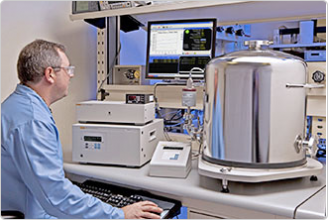
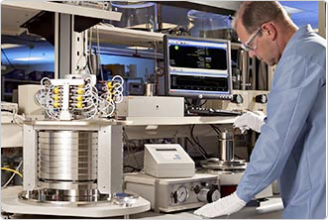
PG9607 features AMH automated mass handling technology to allow fully automated testing in both gauge and absolute mode. Manual steps are removed from its operation, saving time and delivering metrological advantages. When AMH is coupled with automatic pressure control and computer software, repeated and extended tests become practical, making PG9607 a powerful calibration and research tool.
PG9607 is the result of Fluke Calibration's extensive work with national metrology institutes (NMIs) to minimize pressure measurement uncertainty and years of supplying PG7000 piston gauges to NMIs and other top pressure metrology labs worldwide.
Refined 50 mm piston-cylinder design
PG9602/9607’s piston-cylinder assembly builds upon more than 15 years of design, manufacture and calibration of 50 mm piston-cylinders. PC-9607-5 is a 5 kPa/kg piston-cylinder with a stationary piston and floating cylinder design. Improved manufacturing and testing methods are used to produce a very low distortion assembly. The 50 mm piston-cylinder provides exceptional performance up to 500 kPa with a 100 kg mass load. The PG9607 mounting post allows an independent controlled clearance pressure to be applied to the inside of the piston, thus predictably varying the size of the gap between the piston and cylinder for advanced study
Innovations to minimize uncertainty
Two decades ago, DH Instruments PG7000 family of piston gauges introduced the advantages of on-board sensing and monitoring technology, as well as other performance and ergonomic enhancements. The PG9000 platform adds several innovations to improve pressure measurements even further.
The platform consists of a PG terminal, a piston gauge base and a new remote electronics module. The terminal is the user interface. It stores metrological component data, reports operating and ambient condition status and calculates pressure.
The PG9000 piston gauge base supports automatic piston-cylinder rotation and mass handling, but all of the electronics to support the sensors and rotation control have been relocated to a remote electronics module. This architecture supports the best possible temperature stability at the base, even with prolonged vacuum operation, since any significant sources of heat are located away from the base.
The PG9602/9607 mounting post has two integrated PRTs for reduced piston-cylinder temperature uncertainty. The PRTs are easily removed for calibration. A capacitance diaphragm gauge is included in the optional vacuum reference hardware for making residual vacuum measurements in absolute mode. PG9607 can also integrate the measurement output from virtually any user-supplied vacuum sensor.
Metrology supported by automation
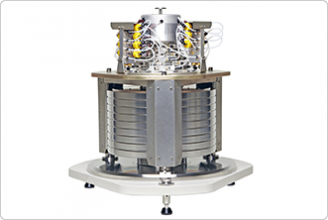
AMH automated mass handling technology is expanded on PG9602/9607 to provide gauge and absolute operation with up to a 100 kg mass load. Eliminating manual mass loading minimizes mechanical wear, improving mass stability. The automated mass handler operates inside the evacuated bell jar, so the time to release and draw a vacuum while changing masses between test points is eliminated. The sustained vacuum produces lower and more static residual vacuum values. Total test time and productivity are greatly improved, especially on absolute pressure tests. More importantly, full automation promotes highly consistent measurements and allows extensive tests with many test points that would be impractical to perform manually. And with the help of calibration management software like COMPASS® for Pressure, tests can be run fully unattended.
General specifications |
|
| Electrical power | 85/264 V ac, 50/60 Hz, 22 VA maximum consumption |
| Temperature | Operating: 15 °C to 35 °C (59 °F to 95 °F) Storage: -20 °C to 70 °C (-4 °F to 158 °F) |
| Humidity | Operating: 5 % to 95 % RH, non-condensing |
| Weight | Instrument platform with no mass or piston-cylinder loaded PG9602/9607 (without vacuum hardware): 34 kg (74 lb) Remote electronics module: 1.9 kg (4 lb) PG terminal: 1.4 kg (3 lb) Optional vacuum reference hardware: 16 kg (36 lb) |
| Dimensions (H x W x D) | PG9602/9607 base (without vacuum hardware): 34.1 cm x 54.3 cm x 52.3 cm (13.4 in x 21.4 in x 20.6 in) (Height: top of piston-cylinder assembly) PG9602/9607 base (with optional vacuum bell jar and vacuum gauge connected): Remote electronics module: 10.2 cm x 35.1 cm x 19.6 cm (4 in x 13.8 in x 7.7 in) PG terminal: 12 cm x 15 cm x 20 cm (4.7 in x 5.9 in x 7.9 in) |
| Microprocessors | Instrument platform: Motorola 68302 PG terminal: Hitachi 64180 |
| Communication ports | RS-232 COM 1: Host computer COM2: Residual vacuum sensor (external) COM3: Automated pressure controller COM4: Unused/spare IEEE-488 Host computer |
| Overall pressure range | Gauge: 11 kPa to 500 kPa, 0.11 bar to 5 bar, (1.6 to 72.5 psi)1 Absolute: 11 kPa to 500 kPa, 0.11 bar to 5 bar, (1.6 to 72.5 psi)1 |
| Operating media | Gas: nitrogen, helium, dry air (dewpoint ≤ -40 ºC) |
| Maximum mass load | 100 kg1 |
| Pressure connections | PG 9607 base Test port: DH200* Controlled clearance pressure: DH200* * Gland and collar fitting for 6.35 mm (0.25 in) coned and left hand threaded tubes. Equivalent to AE SF250C, HIP LF4, etc. AMH drive AMH vent Remote electronics module Vacuum bell jar 3x 40 mm ISO/KF flange, 1x 50 mm ISO/KF flange (top) CE conformance |
1 MS-AMH-100 mass set contains approximately 104.5 kg of mass. Combined with the piston or cylinder and bell assembly, total mass loads may be up to 106 kg, resulting in pressures of up to 530 kPa (5.3 bar, 76.9 psi).
AMH-100-VAC Automated Mass Handler (optional) |
|
| Power requirements | 15 V dc @ 2 A, 30 W max. consumption |
| Temperature | Operating: 15 ºC to 35 ºC (59 °F to 95 °F) |
| Dimensions (H x W x D) | 41 cm x 41 cm x 36 cm (16.3 in x 16.1 in x 14.1 in) |
| Weight | 12 kg (25 lbs) |
| Power/communications | Custom 8-pin connector |
| AMH drive air supply | 550 kPa (80 psi), ± 10 %, minimal flow |
| AMH vacuum supply | At least 50 kPa (7.5 pi) under atmosphere, minimal flow |
| Pressure connections | Pressure: Quick connector DESO (double end shut off) type stem Vacuum: Quick connector SESO (single end shut off) type stem |
Piston-cylinder assembly (PC-9607-5) |
|
| The piston is mounted in a fixed position on the mounting post. The cylinder floats and is rotated. | |
| Piston material | Tungsten carbide |
| Cylinder material | Tungsten carbide |
| Nominal diameter | 50 mm (1.97 in) |
| Nominal area | 2000 mm2 |
| Mounting system | Free deformation with controlled clearance pressure (CCP) available on inside of piston. |
| Typical drop rate (Full mass load) | < 0.25 mm/min (0.009 in/min) at 500 kPa |
Piston-cylinder assembly |
PC-9602-10 | PC-9602-20 | PC-9602-50 | PC-9602-100 |
| Compatible platform | PG9602 | PG9602 | PG9602 | PG9602 |
| Pressure to mass ratio | 10 kPa/kg | 20 kPa/kg | 50 kPa/kg | 100 kPa/kg |
| Minimum pressure (using mass bell) |
13 kPa (1.9 psi) |
20 kPa (2.9 psi) |
50 kPa (7.3 psi) |
100 kPa (14.5 psi) |
| Maximum pressure (100 kg mass) |
1,000 kPa (145 psi) |
2,000 kPa (290 psi) |
5,000 kPa (725 psi) |
10,000 kPa (1450 psi) |
| Piston material | Tungsten carbide | Tungsten carbide | Tungsten carbide | Tungsten carbide |
| Cylinder material | Tungsten carbide | Tungsten carbide | Tungsten carbide | Tungsten carbide |
| Nominal diameter (mm) | 35 | 25 | 16 | 11 |
| Nominal area (mm2) | 1,000 | 500 | 200 | 100 |
| Mounting system | Simple Free Deformation |
Simple Free Deformation |
Simple Free Deformation |
Simple Free Deformation |
| Typ. N2 drop rate with full mass load (mm/min) |
0.3 | 0.5 | 0.7 | 1.2 |
| Sensitivity1 | 0.02 Pa + 0.5 ppm | 0.04 Pa + 0.5 ppm | 0.1 Pa + 0.5 ppm | 0.2 Pa + 0.5 ppm |
| Reproducibility2 (ppm) | 2 | 2 | 2 | 3 |
1 Sensitivity: The smallest variation in input detectable in output
2 Reproducibility: The root sum square of the stability of effective area and stability of the AMH-100 mass set for 1 year
Mass sets |
|
| All masses are delivered in molded, reusable, transit cases with custom inserts. | |
| Masses | Material: 304L non-magnetic stainless steel
Finish: Electropolished Adjustment tolerance: ± 20 ppm of nominal value Uncertainty of measured values: ± 5 ppm or 1 mg, whichever is greater Uncertainty of measured values: ± 1 mg |
Pressure measurements |
|
| For uncertainty in piston-cylinder effective area and typical measurement uncertainty in pressure defined by the piston gauge, see the piston-cylinder calibration report and current revision of Technical Note 0180TN12 Typical Pressure Measurement Uncertainty Defined by a PG9607 or PG9602 Piston Gauge. | |
| Sensitivity1 | 0.005 Pa + 0.5 ppm |
| Reproducibility2 | ± 2 ppm + 0.05 Pa |
1 Sensitivity: The smallest variation in input detectable in output.
2 Reproducibility: The root sum square of the stability of effective area and stability of the AMH-100 mass set for 1 year.
Ambient and instrument condition measurements |
|
| Temperature (Ambient) | Range: 0 °C to 40 °C (32 °F to 104 °F) Resolution: 0.1 °C (32.18 °F) Measurement uncertainty: ± 1 °C (33.8 °F) |
| Temperature (Piston-cylinder module) | Range: 0 °C to 40 °C (32 °F to 104 °F) Resolution: 0.01 °C (32.02) Measurement uncertainty: ± 0.1 °C (32.18 °F) |
| Barometric pressure with internal sensor | Range: 70 kPa to 110 kPa Resolution: 10 Pa Measurement uncertainty: ± 140 Pa Barometric pressure can also be read automatically with any RS-232 device such as a DHI RPM. |
| Relative humidity | Range: 5 % to 95 % RH Resolution: 1 % RH Measurement uncertainty: ± 10 % RH |
| Piston position | Range: ± 4.5 mm Resolution: 0.1 mm |
| Piston rotation (Rate and deceleration) | Range: 2 rpm to 99 rpm Resolution: 1 rpm |
| Vacuum (optional) | Range: 0 Pa to 13 Pa Resolution: 0.01 Pa Measurement uncertainty: ± 0.05 Pa + 0.5 % of reading |
| Model Name | Description |
|---|---|
| PG9607 Platform |
Gas operated piston gauge
|
| PG9600-VAC-REF optional Vacuum Reference Hardware |
Hardware required for absolute pressure measurements.
Delivered with reusable shipping case and calibration certificate for CDG. Vacuum pump and interconnections to bell jar assembly supplied separately. |
| PC-9607-5 Piston-Cylinder Module |
Gas operated assembly
PC-9607-5 piston-cylinder is compatible with PG7607 piston gauge bases. Legacy PC-7607-5 piston-cylinders are also usable up to 190 kPa (1.9 bar, 27.5 psi) with the PG9607 base. |
| MS-7001-35 |
Mass Set (for manual operation without AMH) |
| MS-7002-35 |
Mass Set (for manual operation without AMH) |
| MS-7002-40 |
Mass Set (for manual operation without AMH) |
| MS-7002-45 |
Mass Set (for manual operation without AMH) |
| MS-7002-55 |
Mass Set (for manual operation without AMH) |
| MS-7002-80 |
Mass Set (for manual operation without AMH) |
| MS-7002-100 |
Mass Set (for manual operation without AMH) Manual 100 kg mass set is typically used when AMH is not purchased. Smaller mass sets are available when maximum pressure range is not required. Delivered with reusable shipping and storage cases and calibration certificate. Existing MS-7001/7002 mass sets from PG7000 piston gauge systems are compatible with PG9607 |
| AMH-100-VAC |
Automated Mass Handler Note that AMH-100 (gauge pressure model) is not compatible with PG9607 without modification. |
| MS-AMH-100 |
Mass Set (for automatic operation with AMH) Nominal total mass: 100 kg Mass set includes AMH mass carrying bell. Delivered with reusable mass shipping and storage cases and calibration certificate. |
| MS-AMH-60 |
Mass Set (for automatic operation with AMH) Nominal total mass: 60 kg Mass set includes AMH mass carrying bell. Delivered with reusable mass shipping and storage cases and calibration certificate. Mass sets smaller than 100 kg are available if the maximum pressure range is not required. |
| MS-AMH-90 |
Mass Set (for automatic operation with AMH) Nominal total mass: 90 kg Mass set includes AMH mass carrying bell. Delivered with reusable mass shipping and storage cases and calibration certificate. Mass sets smaller than 100 kg are available if the maximum pressure range is not required. |
| MB-7002-0.8 |
Mass Bell Mass bell must be purchased to use manual mass sets with PG9000 . Mass bell is not included with the PG9000 platform or manual mass sets. |
| PG9602 Platform |
Gas operated piston gauge
|
| PC-9602-10 Piston-Cylinder Module |
Gas operated assembly
|
| PC-9602-20 Piston-Cylinder Module |
Gas operated assembly
|
| PC-9602-50 Piston-Cylinder Module |
Gas operated assembly
|
| PC-9602-100 Piston-Cylinder Module |
Gas operated assembly
|
Accessories common to all models:
| Accessory | Description |
|---|---|
| Automated Mass Handling |
See AMH-100 and AMH mass sets for automated mass handling options. |
| 3990-801 Manual Pressure Control Pack |
Manual Pressure Controller to 7 MPa (1000 psi) |
| 3990-803 Manual Pressure Control Pack |
Manual Pressure Control to 20 MPa (3000 psi) |
| COMPASS |
Calibration Assistance Software |
| PPC4 A700Ku |
Automatic Pressure Control to 700 kPa (100 psi) |
| PPC4 A2Mu |
Automatic Pressure Control to 2 MPa (300 psi) |
| MPC1-1000 |
Manually operated gas pressure controller, pressure range vacuum to 7 MPa (1,000 psi) |
| PPC4 A700Ku |
Automatic Pressure Control to 700 kPa (100 psi) |
| PPC4 A14Mu |
Automated Pressure Control to 14 MPa (2000 psi) |
| Product Manuals |
|---|
| Brochures |
|---|
| Firmware |
|---|
| PG7000/PG9000 Ver 3.1.5.255 Embedded Software |
| Papers / Articles |
|---|
| Cal Lab Magazine, April-May-June 2013 |
| On-Demand Webinars |
|---|
| Pressure Series, Part 3 of 3, Advanced Pressure Calibration |
| Press Releases |
|---|
| Fluke Calibration introduces new DHI PG9607 piston gauge |
- Home
- Products
- New Products
- Electrical Calibration
- RF Calibration
- Data Acquisition and Test Equipment
- Temperature Calibration
- Humidity Calibration
- Pressure Calibration
- Flow Calibration
- Process Calibration Tools
- Calibration Software
- Service and Support
- All Calibration Instruments
- Handheld Test Tools
- Purchase Info
- News
- Training and Events
- Literature and Education
- Service and Support
- About Us
Sidebar Request a Quote
Request a quote


